Skip navigation

Category Archives: macOS

The past two posts have (lightly) introduced how to use compiled Swift code in R, but they’ve involved a bunch of “scary” command line machinations and incantations.

One feature of {Rcpp} I’ve always 💙 is the cppFunction() (“r-lib” zealots have a similar cpp11::cpp_function()) which lets one experiment with C[++] code in R with as little friction as possible. To make it easier to start experimenting with Swift, I’ve built an extremely fragile swift_function() in {swiftr} that intends to replicate this functionality. Explaining it will be easier with an example.

Reading Property Lists in R With Swift

macOS relies heavily on property lists for many, many things. These can be plain text (XML) or binary files and there are command-line tools and Python libraries (usable via {reticulate}) that can read them along with the good ‘ol XML::readKeyValueDB(). We’re going to create a Swift function to read property lists and return JSON which we can use back in R via {jsonlite}.

This time around there’s no need to create extra files, just install {swiftr} and your favorite R IDE and enter the following (expository is after the code):

library(swiftr)

swift_function(
  code = '

func ignored() {
  print("""
this will be ignored by swift_function() but you could use private
functions as helpers for the main public Swift function which will be 
made available to R.
""")
}  

@_cdecl ("read_plist")
public func read_plist(path: SEXP) -> SEXP {

  var out: SEXP = R_NilValue

  do {
    // read in the raw plist
    let plistRaw = try Data(contentsOf: URL(fileURLWithPath: String(cString: R_CHAR(STRING_ELT(path, 0)))))

    // convert it to a PropertyList  
    let plist = try PropertyListSerialization.propertyList(from: plistRaw, options: [], format: nil) as! [String:Any]

    // serialize it to JSON
    let jsonData = try JSONSerialization.data(withJSONObject: plist , options: .prettyPrinted)

    // setup the JSON string return
    String(data: jsonData, encoding: .utf8)?.withCString { 
      cstr in out = Rf_mkString(cstr) 
    }

  } catch {
    debugPrint("\\(error)")
  }

  return(out)

}
')

This new swift_function() function — for the moment (the API is absolutely going to change) — is defined as:

swift_function(
  code,
  env = globalenv(),
  imports = c("Foundation"),
  cache_dir = tempdir()
)

where:

  • code is a length 1 character vector of Swift code
  • env is the environment to expose the function in (defaults to the global environment)
  • imports is a character vector of any extra Swift frameworks that need to be imported
  • cache_dir is where all the temporary files will be created and compiled dynlib will be stored. It defaults to a temporary directory so specify your own directory (that exists) if you want to keep the files around after you close the R session

Folks familiar with cppFunction() will notice some (on-purpose) similarities.

The function expects you to expose only one public Swift function which also (for the moment) needs to have the @_cdecl decorator before it. You can have as many other valid Swift helper functions as you like, but are restricted to one function that will be turned into an R function automagically.

In this example, swift_function() will see public func read_plist(path: SEXP) -> SEXP { and be able to identify

  • the function name (read_plist)
  • the number of parameters (they all need to be SEXP, for now)
  • the names of the parameters

A complete source file with all the imports will be created and a pre-built bridging header (which comes along for the ride with {swiftr}) will be included in the compilation step and a dylib will be built and loaded into the R session. Finally, an R function that wraps a .Call() will be created and will have the function name of the Swift function as well as all the parameter names (if any).

In the case of our example, above, the built R function is:

function(path) {
  .Call("read_plist", path)
}

There’s a good chance you’re using RStudio, so we can test this with it’s property list, or you can substitute any other application’s property list (or any .plist you have) to test this out:

read_plist("/Applications/RStudio.app/Contents/Info.plist") %>% 
  jsonlite::fromJSON() %>% 
  str(1)
## List of 32
##  $ NSPrincipalClass                     : chr "NSApplication"
##  $ NSCameraUsageDescription             : chr "R wants to access the camera."
##  $ CFBundleIdentifier                   : chr "org.rstudio.RStudio"
##  $ CFBundleShortVersionString           : chr "1.4.1093-1"
##  $ NSBluetoothPeripheralUsageDescription: chr "R wants to access bluetooth."
##  $ NSRemindersUsageDescription          : chr "R wants to access the reminders."
##  $ NSAppleEventsUsageDescription        : chr "R wants to run AppleScript."
##  $ NSHighResolutionCapable              : logi TRUE
##  $ LSRequiresCarbon                     : logi TRUE
##  $ NSPhotoLibraryUsageDescription       : chr "R wants to access the photo library."
##  $ CFBundleGetInfoString                : chr "RStudio 1.4.1093-1, © 2009-2020 RStudio, PBC"
##  $ NSLocationWhenInUseUsageDescription  : chr "R wants to access location information."
##  $ CFBundleInfoDictionaryVersion        : chr "6.0"
##  $ NSSupportsAutomaticGraphicsSwitching : logi TRUE
##  $ CSResourcesFileMapped                : logi TRUE
##  $ CFBundleVersion                      : chr "1.4.1093-1"
##  $ OSAScriptingDefinition               : chr "RStudio.sdef"
##  $ CFBundleLongVersionString            : chr "1.4.1093-1"
##  $ CFBundlePackageType                  : chr "APPL"
##  $ NSContactsUsageDescription           : chr "R wants to access contacts."
##  $ NSCalendarsUsageDescription          : chr "R wants to access calendars."
##  $ NSMicrophoneUsageDescription         : chr "R wants to access the microphone."
##  $ CFBundleDocumentTypes                :'data.frame':  16 obs. of  8 variables:
##  $ NSPhotoLibraryAddUsageDescription    : chr "R wants write access to the photo library."
##  $ NSAppleScriptEnabled                 : logi TRUE
##  $ CFBundleExecutable                   : chr "RStudio"
##  $ CFBundleSignature                    : chr "Rstd"
##  $ NSHumanReadableCopyright             : chr "RStudio 1.4.1093-1, © 2009-2020 RStudio, PBC"
##  $ CFBundleName                         : chr "RStudio"
##  $ LSApplicationCategoryType            : chr "public.app-category.developer-tools"
##  $ CFBundleIconFile                     : chr "RStudio.icns"
##  $ CFBundleDevelopmentRegion            : chr "English"

FIN

A source_swift() function is on the horizon as is adding a ton of checks/validations to swift_function(). I’ll likely be adding some of the SEXP and R Swift utility functions I’ve demonstrated in the [unfinished] book to make it fairly painless to interface Swift and R code in this new and forthcoming function.

As usual, kick the tyres, submit feature requests and bugs in any forum that’s comfortable and stay strong, wear a 😷, and socially distanced when out and about.

The previous post introduced the topic of how to compile Swift code for use in R using a useless, toy example. This one goes a bit further and makes a case for why one might want to do this by showing how to use one of Apple’s machine learning libraries, specifically the Natural Language one, focusing on extracting parts of speech from text.

I made a parts-of-speech directory to keep the code self-contained. In it are two files. The first is partsofspeech.swift (swiftc seems to dislike dashes in names of library code and I dislike underscores):

import NaturalLanguage
import CoreML

extension Array where Element == String {
  var SEXP: SEXP? {
    let charVec = Rf_protect(Rf_allocVector(SEXPTYPE(STRSXP), count))
    defer { Rf_unprotect(1) }
    for (idx, elem) in enumerated() { SET_STRING_ELT(charVec, idx, Rf_mkChar(elem)) }
    return(charVec)
  }
}

@_cdecl ("part_of_speech")
public func part_of_speech(_ x: SEXP) -> SEXP {

  let text = String(cString: R_CHAR(STRING_ELT(x, 0)))
  let tagger = NLTagger(tagSchemes: [.lexicalClass])

  tagger.string = text

  let options: NLTagger.Options = [.omitPunctuation, .omitWhitespace]

  var txts = [String]()
  var tags = [String]()

  tagger.enumerateTags(in: text.startIndex..<text.endIndex, unit: .word, scheme: .lexicalClass, options: options) { tag, tokenRange in
    if let tag = tag {
      txts.append("\(text[tokenRange])")
      tags.append("\(tag.rawValue)")
    }
    return true
  }

  let out = Rf_protect(Rf_allocVector(SEXPTYPE(VECSXP), 2))
  SET_VECTOR_ELT(out, 0, txts.SEXP)
  SET_VECTOR_ELT(out, 1, tags.SEXP)
  Rf_unprotect(1)

  return(out!)
}

The other is bridge code that seems to be the same for every one of these (or could be) so I’ve just named it swift-r-glue.h (it’s the same as the bridge code in the previous post):

#define USE_RINTERNALS

#include <R.h>
#include <Rinternals.h>

const char* R_CHAR(SEXP x);

Let’s walk through the Swift code.

We need to two imports:

import NaturalLanguage
import CoreML

to make use of the NLP functionality provided by Apple.

The following extension to the String Array class:

extension Array where Element == String {
  var SEXP: SEXP? {
    let charVec = Rf_protect(Rf_allocVector(SEXPTYPE(STRSXP), count))
    defer { Rf_unprotect(1) }
    for (idx, elem) in enumerated() { SET_STRING_ELT(charVec, idx, Rf_mkChar(elem)) }
    return(charVec)
  }
}

will reduce the amount of code we need to type later on to turn Swift String Arrays to R character vectors.

The start of the function:

@_cdecl ("part_of_speech")
public func part_of_speech(_ x: SEXP) -> SEXP {

tells swiftc to make this a C-compatible call and notes that the function takes one parameter (in this case, it’s expecting a length 1 character vector) and returns an R-compatible value (which will be a list that we’ll turn into a data.frame in R just for brevity).

The following sets up our inputs and outputs:

  let text = String(cString: R_CHAR(STRING_ELT(x, 0)))
  let tagger = NLTagger(tagSchemes: [.lexicalClass])

  tagger.string = text

  let options: NLTagger.Options = [.omitPunctuation, .omitWhitespace]

  var txts = [String]()
  var tags = [String]()

We convert the passed-in parameter to a Swift String, initialize the NLP tagger, and setup two arrays to hold the results (sentence component in txts and the part of speech that component is in tags).

The following code is mostly straight from Apple and (inefficiently) populates the previous two arrays:


tagger.enumerateTags(in: text.startIndex..<text.endIndex, unit: .word, scheme: .lexicalClass, options: options) { tag, tokenRange in if let tag = tag { txts.append("\(text[tokenRange])") tags.append("\(tag.rawValue)") } return true }

Finally, we use the Swift-R bridge to make a list much like one would in C:


let out = Rf_protect(Rf_allocVector(SEXPTYPE(VECSXP), 2)) SET_VECTOR_ELT(out, 0, txts.SEXP) SET_VECTOR_ELT(out, 1, tags.SEXP) Rf_unprotect(1) return(out!)

To get a shared library we can use from R, we just need to compile this like last time:

swiftc \
  -I /Library/Frameworks/R.framework/Headers \
  -F/Library/Frameworks \
  -framework R \
  -import-objc-header swift-r-glue.h \
  -emit-library \
  partsofspeech.swift

Let’s run that on some text! First, we’ll load the new shared library into R:

dyn.load("libpartsofspeech.dylib")

Next, we’ll make a wrapper function to avoid messy .Call(…)s and to make a data.frame:

parts_of_speech <- function(x) {
  res <- .Call("part_of_speech", x)  
  as.data.frame(stats::setNames(res, c("name", "tag")))
}

Finally, let’s try this on some text!

tibble::as_tibble(
  parts_of_speech(paste0(c(
"The comm wasn't working. Feeling increasingly ridiculous, he pushed",
"the button for the 1MC channel several more times. Nothing. He opened",
"his eyes and saw that all the lights on the panel were out. Then he",
"turned around and saw that the lights on the refrigerator and the",
"ovens were out. It wasn’t just the coffeemaker; the entire galley was",
"in open revolt. Holden looked at the ship name, Rocinante, newly",
"stenciled onto the galley wall, and said, Baby, why do you hurt me",
"when I love you so much?"
  ), collapse = " "))
)
## # A tibble: 92 x 2
##    name         tag
##    <chr>        <chr>
##  1 The          Determiner
##  2 comm         Noun
##  3 was          Verb
##  4 n't          Adverb
##  5 working      Verb
##  6 Feeling      Verb
##  7 increasingly Adverb
##  8 ridiculous   Adjective
##  9 he           Pronoun
## 10 pushed       Verb
## # … with 82 more rows

FIN

If you’re playing along at home, try adding a function to this Swift file that uses Apple’s entity tagger.

The next installment of this topic will be how to wrap all this into a package (then all these examples get tweaked and go into the tome.

I’ve been on a Swift + R bender for a while now, but have been envious of the pure macOS/iOS (et al) folks who get to use Apple’s seriously ++good machine learning libraries, which are even more robust on the new M1 hardware (it’s cool having hardware components dedicated to improving the performance of built models).

Sure, it’s pretty straightforward to make a command-line utility that can take data input, run them through models, then haul the data back into R, but I figured it was about time that Swift got the “Rust” and “Go” treatment in terms of letting R call compiled Swift code directly. Thankfully, none of this involves using Xcode since it’s one of the world’s worst IDEs.

To play along at home you’ll need macOS and at least the command line tools installed (I don’t think this requires a full Xcode install, but y’all can let me know if it does in the comments). If you can enter swiftc at a terminal prompt and get back <unknown>:0: error: no input files then you’re good-to-go.

Hello, Swift!

To keep this post short (since I’ll be adding this entire concept to the SwiftR tome), we’ll be super-focused and just build a shared library we can dynamically load into R. That library will have one function which will be to let us say hello to the planet with a customized greeting.

Make a new directory for this effort (I called mine greetings) and create a greetings.swift file with the following contents:

All this code is also in this gist.

@_cdecl ("greetings_from")
public func greetings_from(_ who: SEXP) -> SEXP {
  print("Greetings, 🌎, it's \(String(cString: R_CHAR(STRING_ELT(who, 0))))!")
  return(R_NilValue)
}

Before I explain what’s going on there, also create a geetings.h file with the following contents:

#define USE_RINTERNALS

#include <R.h>
#include <Rinternals.h>

const char* R_CHAR(SEXP x);

In the Swift file, there’s a single function that takes an R SEXP and converts it into a Swift String which is then routed to stdout (not a “great” R idiom, but benign enough for an intro example). Swift functions aren’t C functions and on their own do not adhere to C calling conventions. Unfortunately R’s ability to work with dynamic library code requires such a contract to be in place. Thankfully, the Swift Language Overlords provided us with the ability to instruct the compiler to create library code that will force the calling conventions to be C-like (that’s what the @cdecl is for).

We’re using SEXP, some R C-interface functions, and even the C version of NULL in the Swift code, but we haven’t done anything in the Swift file to tell Swift about the existence of these elements. That’s what the C header file is for (I added the R_CHAR declaration since complex C macros don’t work in Swift).

Now, all we need to do is make sure the compiler knows about the header file (which is a “bridge” between C and Swift), where the R framework is, and that we want to generate a library vs a binary executable file as we compile the code. Make sure you’re in the same directory as both the .swift and .h file and execute the following at a terminal prompt:

swiftc \
  -I /Library/Frameworks/R.framework/Headers \ # where the R headers are
  -F/Library/Frameworks \                      # where the R.framework lives
  -framework R \                               # we want to link against the R framework
  -import-objc-header greetings.h \            # this is our bridging header which will make R C things available to Swift
  -emit-library \                              # we want a library, not an exe
  greetings.swift                              # our file!

If all goes well, you should have a libgreetings.dylib shared library in that directory.

Now, fire up a R console session in that directory and do:

greetings_lib <- dyn.load("libgreetings.dylib")

If there are no errors, the shared library has been loaded into your R session and we can use the function we just made! Let’s wrap it in an R function so we’re not constantly typing .Call(…):

greetings_from <- function(who = "me") {
  invisible(.Call("greetings_from", as.character(who[1])))
}

I also took the opportunity to make sure we are sending a length-1 character vector to the C/Swift function.

Now, say hello!

greetings_from("hrbrmstr")

And you should see:

Greetings, 🌎, it's hrbrmstr!

FIN

We’ll stop there for now, but hopefully this small introduction has shown how straightforward it can be to bridge Swift & R in the other direction.

I’ll have another post that shows how to extend this toy example to use one of Apple’s natural language processing libraries, and may even do one more on how to put all this into a package before I shunt all the individual posts into a few book chapters.

Last week I introduced a new bookdown series on how to embed R into a macOS Swift application.

The initial chapters focused on core concepts and showed how to build a macOS compiled, binary command line application that uses embedded R for some functionality.

This week, a new chapter is up that walks you though how to build a basic SwiftUI application that takes input from the user, performs a computation in R (via embedded R) and displays the result of the computation back to the user.

The app looks like this:

and — apart from some of the boilerplate interface code from previous chapters — is around ~60 lines of Swift code that ends up consuming ~65 MB of active RAM when run with almost no energy impact (an equivalent Electron-packaged Shiny app would be 130-200 MB of initial RAM and have a significant, constant energy impact).

There’s sufficient boilerplate in this project to extend to write a basic GUI wrapper for various R operations you have hanging around.

Forthcoming chapters will show how to get graphics out of R and into a SwiftUI window as well as how to make a more diminutive Shiny app wrapper that we’ll eventually be able to ship with an embedded copy of the R framework.

Over Christmas break I teased some screencaps:

of some almost-natural “R” looking code (this is a snippet):

Button("Run") {
  do { // calls to R can fail so there are lots of "try"s; poking at less ugly alternatives

    // handling dots in named calls is a WIP
    _  = try R.evalParse("options(tidyverse.quiet = TRUE )")

    // in practice this wld be called once in a model
    try R.library("ggplot2")
    try R.library("hrbrthemes")
    try R.library("magick")

    // can mix initialiation of an R list with Swift and R objects
    let mvals: RObject = [
      "month": [ "Jan", "Feb", "Mar", "Apr", "May", "Jun" ],
      "value": try R.sample(100, 6)
    ]

    // ggplot2! `mvals` is above, `col.hexValue` comes from the color picker
    // can't do R.as.data.frame b/c "dots" so this is a deliberately exposed alternate call
    let gg = try R.ggplot(R.as_data_frame(mvals)) +
      R.geom_col(R.aes_string("month", "value"), fill: col.hexValue) + // supports both [un]named
      R.scale_y_comma() +
      R.labs(
        x: rNULL, y: "# things",
        title: "Monthly Bars"
      ) +
      R.theme_ipsum_gs(grid: "Y")

    // an alternative to {magick} could be getting raw SVG from {svglite} device
    // we get Image view width/height and pass that to {magick}
    // either beats disk/ssd round-trip
    let fig = try R.image_graph(
      width: Double(imageRect.width), 
      height: Double(imageRect.height), 
      res: 144
    )

    try R.print(gg)
    _ = R.dev_off() // can't do R.dev.off b/c "dots" so this is a deliberately exposed alternate call

    let res = try R.image_write(fig, path: rNULL, format: "png")

    imgData = Data(res) // "imgData" is a reactive SwiftUI bound object; when it changes Image does too

  } catch {
  }

}

that works in Swift as part of a SwiftUI app that displays a ggplot2 plot inside of a macOS application.

It doesn’t shell out to R, but uses Swift 5’s native abilities to interface with R’s C interface.

I’m not ready to reveal that SwiftR code/library just yet (break’s over and the core bits still need some tweaking) but I can provide some interim resources with an online book about working with R’s C interface from Swift on macOS. It is uninspiringly called SwiftR — Using R from Swift.

There are, at present, six chapters that introduce the Swift+R concepts via command line apps. These aren’t terribly useful (shebanged R scripts work just fine, #tyvm) in and of themselves, but command line machinations are a much lower barrier to entry than starting right in with SwiftUI (that starts in chapter seven).

FIN

If you’ve wanted a reason to burn ~20GB of drive space with an Xcode installation and start to learn Swift (or learn more about Swift) then this is a resource for you.

The topics in the chapters are also a fairly decent (albeit incomplete) overview of R’s C interface and also how to work with C code from Swift in general.

So, take advantage of the remaining pandemic time and give it a 👀.

Feedback is welcome in the comments or the book code repo (book source repo is in progress).

Hope everyone has a safe and strong new year!

It’s been a while since I’ve posted anything R-related and, while this one will be brief, it may be of use to some R folks who have taken the leap into Big Sur and/or Apple Silicon. Stay to the end for an early Christmas 🎁!

Big Sur Report

As + Twitter-folks know (before my permanent read hiatus began), I’ve been on Big Sur since the very first developer betas were out. I’m even on the latest beta (11.1b1) as I type this post.

Apple picked away at many nits that they introduced with Big Sur, but it’s still more of a “Vista” release than Catalina was given all the clicks involved with installing new software. However, despite making Simon’s life a bit more difficult (re: notarization of R binaries) I’m happy to report that R 4.0.3 and the latest RStudio 1.4 daily releases work great on Big Sur. To be on the safe side, I highly recommend putting the R command-line binaries and RStudio and R-GUI .apps into both “Developer Tools” and “Full Disk Access” in the Security & Privacy preferences pane. While not completely necessary, it may save some debugging (or clicks of “OK”) down the road.

The Xcode command-line tools are finally in a stable state and can be used instead of the massive Xcode.app installation. This was problematic for a few months, but Apple has been pretty consistent keeping it version-stable with Xcode-proper.

Homebrew is pretty much feature complete on Big Sur (for Intel-architecture Macs) and I’ve run everything from the {tidyverse} to {sf}-verse, ODBC/JDBC and more. Zero issues have come up, and with the pending public release (in a few weeks) of 11.1, I can safely say you should be fine moving your R analyses and workflows to Big Sur.

Apple Silicon Report

Along with all the other madness, 2020 has resurrected the “Processor Wars” by making their own ARM 64-bit chips (the M1 series). The Mac mini flavor is fast, but I suspect some of the “feel” of that speed comes from the faster SSDs and beefed up I/O plane to get to those SSDs. These newly released Mac models require Big Sur, so if you’re not prepared to deal with that, you should hold off on a hardware upgrade.

Another big reason to hold off on a hardware upgrade is that the current M1 chips cannot handle more than 16GB of RAM. I do most of the workloads requiring memory heavy-lifting on a 128GB RAM, 8-core Ubuntu 20 server, so what would have been a deal breaker in the past is not much of one today. Still, R folks who have gotten used to 32GB+ of RAM on laptops/desktops will absolutely need to wait for the next-gen chips.

Most current macOS software — including R and RStudio — is going to run in the Rosetta 2 “translation environment”. I’ve not experienced the 20+ seconds of startup time that others have reported, but RStudio 1.4 did take noticeably (but not painfully) longer on the first run than it has on subsequent ones. Given how complex the RStudio app is (chromium engine, Qt, C++, Java, oh my!) I was concerned it might not work at all, but it does indeed work with absolutely no problems. Even the ODBC drivers (Athena, Drill, Postgres) I need to use in daily work all work great with R/RStudio.

This means things can only get even better (i.e. faster) as all these components are built with “Universal” processor support.

Homebrew can work, but it requires the use of the arch command to ensure everything is running the Rosetta 2 translation environment and nothing I’ve installed (from source) has required anything from Homebrew. Do not let that last sentence lull you into a false sense of excitement. So far, I’ve tested:

  • core {tidyverse}
  • {DBI}, {odbc}, {RJDBC}, and (hence) {dbplyr}
  • partially extended {ggplot2}-verse
  • {httr}, {rvest}, {xml2}
  • {V8}
  • a bunch of self-contained, C[++]-backed or just base R-backed stats packages

and they all work fine.

I have installed separate (non-Universal) binaries of fd, ripgrep, bat plus a few others, and almost have a working Rust toolchain up (both Rust and Go are very close to stable on Apple’s M1 architecture).

If there are specific packages/package ecosystems you’d like tested or benchmarked, drop a note in the comments. I’ll likely bee adding more field report updates over the coming weeks as I experiment with additional components.

Now, if you are a macOS R user, you already know — thanks to Tomas and Simon — that we are in wait mode for a working Fortran compiler before we will see a Universal build of R. The good news is that things are working fine under Rosetta 2 (so far).

RStudio Update

If there is any way you can use RStudio Desktop + Server Pro, I would heartily recommend that you do so. The remote R session in-app access capabilities are dreamy and addictive as all get-out.

I also (finally) made a (very stupid simple) PR into the dailies so that RStudio will be counted as a “Developer Tool” for Screen Time accounting.

RSwitch Update

🎁-time! As incentive to try Big Sur and/or Apple Silicon, I started work on version 2 of RSwitch which you can grab from — https://rud.is/rswitch/releases/RSwitch-2.0.0b.app.zip. For those new to RSwitch, it is a modern alternative to the legacy RSwitch that enabled easy switching of R versions on macOS.

The new version requires Big Sur as its based on Apple’s new “SwiftUI” and takes advantage of some components that Apple has not seen fit to make backwards compatible. The current version has fewer features than the 1.x series, but I’m still working out what should and should not be included in the app. Drop notes in the comments with feature requests (source will be up after 🦃 Day).

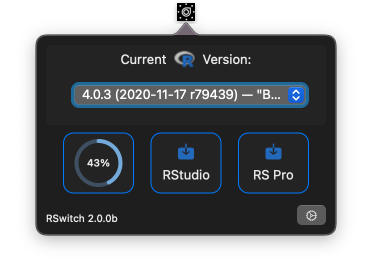
The biggest change is that the app is not just a menu but an popup window:

Each of those tappable download regions presents a cancellable download progress bar (all three can run at the same time), and any downloaded disk images will be auto-mounted. That third tappable download region is for downloading RStudio Pro dailies. You can get notifications for both (or neither) Community and Pro versions:

The R version switchers also provides more info about the installed versions:

(And, yes, the r79439 is what’s in Rversion.h of each of those installations. I kinda want to know why, now.)

The interface is very likely going to change dramatically, but the app is a Universal binary, so will work on M1 and Intel Big Sur Macs.

NOTE: it’s probably a good idea to put this into “Full Disk Access” in the Security & Privacy preferences pane, but you should likely wait until I post the source so you can either build it yourself or validate that it’s only doing what it says on the tin for yourself (the app is benign but you should be wary of any app you put on your Macs these days).

WARNING: For now it’s a Dark Mode only app so if you need it to be non-hideous in Light Mode, wait until next week as I add in support for both modes.

FIN

If you’re running into issues, the macOS R mailing list is probably a better place to post issues with R and BigSur/Apple Silicon, but feel free to drop a comment if you are having something you want me to test/take a stab at, and/or change/add to RSwitch.

(The RSwitch 2.0.0b release yesterday had a bug that I think has been remedied in the current downloadable version.)

As the maintainer of RSwitch — and developer of my own (for personal use) macOS, iOS, watchOS, iPadOS and tvOS apps — I need the full Apple Xcode install around (more R-focused macOS folk can get away with just the command-line tools being installed). As an Apple Developer who insanely runs the macOS & Xcode betas as they are released, I also have the misery of dealing with Xcode usurping authority over .R files every time it receives an update. Sure, I can right-click on an R script, choose “Open With => Other…”, pick RStudio and make it the new default, but clicks interrupt train of thought and take more time than execution a quick shell command at a terminal prompt (which I always have up).

Enter: dtuihttps://github.com/moretension/duti — a small command-line tool that lets you change the default application just by knowing the id of the application you want to make the default. For instance, RStudio’s id is org.rstudio.RStudio which can be obtained via:

$ osascript -e 'id of app "RStudio"'
org.rstudio.RStudio

and, we can use that value in a quick call to duti:

$ duti -s org.rstudio.RStudio .R all

If you’d rather Visual Studio Code or Sublime Text to be the default for .R files, their bundle ids are com.sublimetext.3 and com.microsoft.VSCode, respectively. If you’d rather use Atom, well you really need to think about your life choices.

We can see what the current default for R scripts via:

$ duti -x R
RStudio.app
/Applications/RStudio.app
org.rstudio.RStudio

You can turn the “setter” into a shell alias (preferably zsh or sh alias since bash is going away soon) or shell script for quick use.

Installing duti

Homebrew users can just brew install duti and get on with their day. Folks can also grab the latest release and get on with their day with just a little more effort.

The duti utility can also be compiled on your own (which is preferred so you can look at the source to make sure you know being compromised by a random developer on the internet); but, if you have macOS 10.15 (Catalina), you’ll need to jump through a few hoops since it doesn’t compile out-of-the-box on that platform yet. Thankfully those hoops aren’t too bad thanks to a helpful pull request that adds support for the current version of macOS. (You’ll need at least the command-line developer tools installed for this to work and likely need to brew install autoconf automake libtool to ensure all the toolchain bits that are needed are in place.):

At a terminal prompt, go to where you normally go to clone git repositories and grab the source:

$ git clone git@github.com:moretension/duti.git
$ cd duti
$ git fetch origin pull/39/head:pull_39 # add and fetch the origin for the PR
$ git checkout pull_39                  # switch to the branch
$                                       # review the source code
$                                       # no, really, review the source code!
$ autoconf                              # run autoconf to generate the configure script
$ ./configure                           # generate the Makefile (there will be "checking" and "creating" messages)
$ make                                  # build it! (there will be macOS API deprecation warnings but no errors)
$ make install                          # install it! (you may need to prefix with "sudo -H"; this will put the binary in `/usr/local/bin/` and man page in `/usr/local/share/man/man`

NOTE: If you only have the macOS Xcode command line tools (vs the entirety of Xcode) you’ll need to edit aclocal.m4 before you run autoconf and change line 9 to be:

sdk_path="/Library/Developer/CommandLineTools/SDKs"

since the existing setting assumes you have the full Xcode installation available.

FIN

I’ll be adding this functionality to the next version of RSwitch, letting you specify the application(s) you want to own various R-ish files. It will check for the proper values being in place on a regular basis and set them to your defined preferences (I also need to see if there’s an event I can have RSwitch watch for to trigger the procedure).

If you have another, preferred way to keep ownership of R files drop a blog post link in the comments (or just drop a note the comments with said procedure).

Apple has brought Screen Time to macOS for some time now and that means it has to store this data somewhere. Thankfully, Sarah Edwards has foraged through the macOS filesystem for us and explained where these bits of knowledge are in her post, Knowledge is Power! Using the macOS/iOS knowledgeC.db Database to Determine Precise User and Application Usage, which ultimately reveals the data lurks in ~/Library/Application Support/Knowledge/knowledgeC.db. Sarah also has a neat little Python utility dubbed APOLLO (Apple Pattern of Life Lazy Output’er) which has a smattering of knowledgeC.db canned SQL queries that cover a myriad of tracked items.

Today, we’ll show how to work with this database in R and the {tidyverse} to paint our own pictures of application usage.

There are quite a number of tables in the knowledgeC.db SQLite 3 database:

That visual schema was created in OmniGraffle via a small R script that uses the OmniGraffle automation framework. The OmniGraffle source files are also available upon request.

Most of the interesting bits (for any tracking-related spelunking) are in the ZOBJECT table and to get a full picture of usage we’ll need to join it with some other tables that are connected via a few foreign keys:

There are a few ways to do this in {tidyverse} R. The first is an extended straight SQL riff off of one of Sarah’s original queries:

library(hrbrthemes) # for ggplot2 machinations
library(tidyverse)

# source the knowledge db
kdb <- src_sqlite("~/Library/Application Support/Knowledge/knowledgeC.db")

tbl(
  kdb, 
  sql('
SELECT
  ZOBJECT.ZVALUESTRING AS "app", 
    (ZOBJECT.ZENDDATE - ZOBJECT.ZSTARTDATE) AS "usage",  
    CASE ZOBJECT.ZSTARTDAYOFWEEK 
      WHEN "1" THEN "Sunday"
      WHEN "2" THEN "Monday"
      WHEN "3" THEN "Tuesday"
      WHEN "4" THEN "Wednesday"
      WHEN "5" THEN "Thursday"
      WHEN "6" THEN "Friday"
      WHEN "7" THEN "Saturday"
    END "dow",
    ZOBJECT.ZSECONDSFROMGMT/3600 AS "tz",
    DATETIME(ZOBJECT.ZSTARTDATE + 978307200, \'UNIXEPOCH\') as "start_time", 
    DATETIME(ZOBJECT.ZENDDATE + 978307200, \'UNIXEPOCH\') as "end_time",
    DATETIME(ZOBJECT.ZCREATIONDATE + 978307200, \'UNIXEPOCH\') as "created_at", 
    CASE ZMODEL
      WHEN ZMODEL THEN ZMODEL
      ELSE "Other"
    END "source"
  FROM
    ZOBJECT 
    LEFT JOIN
      ZSTRUCTUREDMETADATA 
    ON ZOBJECT.ZSTRUCTUREDMETADATA = ZSTRUCTUREDMETADATA.Z_PK 
    LEFT JOIN
      ZSOURCE 
    ON ZOBJECT.ZSOURCE = ZSOURCE.Z_PK 
    LEFT JOIN
      ZSYNCPEER
    ON ZSOURCE.ZDEVICEID = ZSYNCPEER.ZDEVICEID
  WHERE
    ZSTREAMNAME = "/app/usage"'
  )) -> usage

usage
## # Source:   SQL [?? x 8]
## # Database: sqlite 3.29.0 [/Users/johndoe/Library/Application Support/Knowledge/knowledgeC.db]
##    app                      usage dow         tz start_time          end_time            created_at         source       
##    <chr>                    <int> <chr>    <int> <chr>               <chr>               <chr>              <chr>        
##  1 com.bitrock.appinstaller    15 Friday      -4 2019-10-05 01:11:27 2019-10-05 01:11:42 2019-10-05 01:11:… MacBookPro13…
##  2 com.tinyspeck.slackmacg…  4379 Tuesday     -4 2019-10-01 13:19:24 2019-10-01 14:32:23 2019-10-01 14:32:… Other        
##  3 com.tinyspeck.slackmacg…  1167 Tuesday     -4 2019-10-01 18:19:24 2019-10-01 18:38:51 2019-10-01 18:38:… Other        
##  4 com.tinyspeck.slackmacg…  1316 Tuesday     -4 2019-10-01 19:13:49 2019-10-01 19:35:45 2019-10-01 19:35:… Other        
##  5 com.tinyspeck.slackmacg… 12053 Thursday    -4 2019-10-03 12:25:18 2019-10-03 15:46:11 2019-10-03 15:46:… Other        
##  6 com.tinyspeck.slackmacg…  1258 Thursday    -4 2019-10-03 15:50:16 2019-10-03 16:11:14 2019-10-03 16:11:… Other        
##  7 com.tinyspeck.slackmacg…  2545 Thursday    -4 2019-10-03 16:24:30 2019-10-03 17:06:55 2019-10-03 17:06:… Other        
##  8 com.tinyspeck.slackmacg…   303 Thursday    -4 2019-10-03 17:17:10 2019-10-03 17:22:13 2019-10-03 17:22:… Other        
##  9 com.tinyspeck.slackmacg…  9969 Thursday    -4 2019-10-03 17:33:38 2019-10-03 20:19:47 2019-10-03 20:19:… Other        
## 10 com.tinyspeck.slackmacg…  2813 Thursday    -4 2019-10-03 20:19:52 2019-10-03 21:06:45 2019-10-03 21:06:… Other        
## # … with more rows

Before explaining what that query does, let’s rewrite it {dbplyr}-style:

tbl(kdb, "ZOBJECT") %>% 
  mutate(
    created_at = datetime(ZCREATIONDATE + 978307200, "UNIXEPOCH", "LOCALTIME"),
    start_dow = case_when(
      ZSTARTDAYOFWEEK == 1 ~ "Sunday",
      ZSTARTDAYOFWEEK == 2 ~ "Monday",
      ZSTARTDAYOFWEEK == 3 ~ "Tuesday",
      ZSTARTDAYOFWEEK == 4 ~ "Wednesday",
      ZSTARTDAYOFWEEK == 5 ~ "Thursday",
      ZSTARTDAYOFWEEK == 6 ~ "Friday",
      ZSTARTDAYOFWEEK == 7 ~ "Saturday"
    ),
    start_time = datetime(ZSTARTDATE + 978307200, "UNIXEPOCH", "LOCALTIME"),
    end_time = datetime(ZENDDATE + 978307200, "UNIXEPOCH", "LOCALTIME"),
    usage = (ZENDDATE - ZSTARTDATE),
    tz = ZSECONDSFROMGMT/3600 
  ) %>% 
  left_join(tbl(kdb, "ZSTRUCTUREDMETADATA"), c("ZSTRUCTUREDMETADATA" = "Z_PK")) %>% 
  left_join(tbl(kdb, "ZSOURCE"), c("ZSOURCE" = "Z_PK")) %>% 
  left_join(tbl(kdb, "ZSYNCPEER"), "ZDEVICEID") %>% 
  filter(ZSTREAMNAME == "/app/usage")  %>% 
  select(
    app = ZVALUESTRING, created_at, start_dow, start_time, end_time, usage, tz, source = ZMODEL
  ) %>% 
  mutate(source = ifelse(is.na(source), "Other", source)) %>% 
  collect() %>% 
  mutate_at(vars(created_at, start_time, end_time), as.POSIXct) -> usage

What we’re doing is pulling out the day of week, start/end usage times & timezone info, app bundle id, source of the app interactions and the total usage time for each entry along with when that entry was created. We need to do some maths since Apple stores time-y whime-y info in its own custom format, plus we need to convert numeric DOW to labeled DOW.

The bundle ids are pretty readable, but they’re not really intended for human consumption, so we’ll make a translation table for the bundle id to app name by using the mdls command.

list.files(
  c("/Applications", "/System/Library/CoreServices", "/Applications/Utilities", "/System/Applications"), # main places apps are stored (there are potentially more but this is sufficient for our needs)
  pattern = "\\.app$", 
  full.names = TRUE
) -> apps

x <- sys::exec_internal("mdls", c("-name", "kMDItemCFBundleIdentifier", "-r", apps))

# mdls null (\0) terminates each entry so we have to do some raw surgery to get it into a format we can use
x$stdout[x$stdout == as.raw(0)] <- as.raw(0x0a)

tibble(
  name = gsub("\\.app$", "", basename(apps)),
  app = read_lines(x$stdout) 
) -> app_trans

app_trans
## # A tibble: 270 x 2
##    name                    app                                    
##    <chr>                   <chr>                                  
##  1 1Password 7             com.agilebits.onepassword7             
##  2 Adium                   com.adiumX.adiumX                      
##  3 Agenda                  com.momenta.agenda.macos               
##  4 Alfred 4                com.runningwithcrayons.Alfred          
##  5 Amazon Music            com.amazon.music                       
##  6 Android File Transfer   com.google.android.mtpviewer           
##  7 Awsaml                  com.rapid7.awsaml                      
##  8 Bartender 2             com.surteesstudios.Bartender           
##  9 BBEdit                  com.barebones.bbedit                   
## 10 BitdefenderVirusScanner com.bitdefender.BitdefenderVirusScanner
## # … with 260 more rows

The usage info goes back ~30 days, so let’s do a quick summary of the top 10 apps and their total usage (in hours):

usage %>% 
  group_by(app) %>% 
  summarise(first = min(start_time), last = max(end_time), total = sum(usage, na.rm=TRUE)) %>% 
  ungroup() %>% 
  mutate(total = total / 60 / 60) %>% # hours
  arrange(desc(total)) %>% 
  left_join(app_trans) -> overall_usage

overall_usage %>% 
  slice(1:10) %>% 
  left_join(app_trans) %>%
  mutate(name = fct_inorder(name) %>% fct_rev()) %>%
  ggplot(aes(x=total, y=name)) + 
  geom_segment(aes(xend=0, yend=name), size=5, color = ft_cols$slate) +
  scale_x_comma(position = "top") +
  labs(
    x = "Total Usage (hrs)", y = NULL,
    title = glue::glue('App usage in the past {round(as.numeric(max(usage$end_time) - min(usage$start_time), "days"))} days')
  ) +
  theme_ft_rc(grid="X")

There’s a YUGE flaw in the current way macOS tracks application usage. Unlike iOS where apps really don’t run simultaneously (with iPadOS they kinda can/do, now), macOS apps are usually started and left open along with other apps. Apple doesn’t do a great job identifying only active app usage activity so many of these usage numbers are heavily inflated. Hopefully that will be fixed by macOS 10.15.

We have more data at our disposal, so let’s see when these apps get used. To do that, we’ll use segments to plot individual usage tracks and color them by weekday/weekend usage (still limiting to top 10 for blog brevity):

usage %>% 
  filter(app %in% overall_usage$app[1:10]) %>% 
  left_join(app_trans) %>%
  mutate(name = factor(name, levels = rev(overall_usage$name[1:10]))) %>% 
  ggplot() +
  geom_segment(
    aes(
      x = start_time, xend = end_time, y = name, yend = name, 
      color = ifelse(start_dow %in% c("Saturday", "Sunday"), "Weekend", "Weekday")
    ),
    size = 10,
  ) +
  scale_x_datetime(position = "top") +
  scale_colour_manual(
    name = NULL,
    values = c(
      "Weekend" = ft_cols$light_blue, 
      "Weekday" = ft_cols$green
    )
  ) +
  guides(
    colour = guide_legend(override.aes = list(size = 1))
  ) +
  labs(
    x = NULL, y = NULL,
    title = glue::glue('Top 10 App usage on this Mac in the past {round(as.numeric(max(usage$end_time) - min(usage$start_time), "days"))} days'),
    subtitle = "Each segment represents that app being 'up' (Open to Quit).\nUnfortunately, this is what Screen Time uses for its calculations on macOS"
  ) +
  theme_ft_rc(grid="X") +
  theme(legend.position = c(1, 1.25)) +
  theme(legend.justification = "right")

I’m not entirely sure “on this Mac” is completely accurate since I think this syncs across all active Screen Time devices due to this (n is in seconds):

count(usage, source, wt=usage, sort=TRUE)
## # A tibble: 2 x 2
##   source               n
##   <chr>            <int>
## 1 Other          4851610
## 2 MacBookPro13,2 1634137

The “Other” appears to be the work-dev Mac but it doesn’t have the identifier mapped so I think that means it’s the local one and that the above chart is looking at Screen Time across all devices. I literally (right before this sentence) enabled Screen Time on my iPhone so we’ll see if that ends up in the database and I’ll post a quick update if it does.

We’ll take one last look by day of week and use a heatmap to see the results:

count(usage, start_dow, app, wt=usage/60/60) %>% 
  left_join(app_trans) %>%
  filter(app %in% overall_usage$app[1:10]) %>% 
  mutate(name = factor(name, levels = rev(overall_usage$name[1:10]))) %>% 
  mutate(start_dow = factor(start_dow, c("Sunday", "Monday", "Tuesday", "Wednesday", "Thursday", "Friday", "Saturday"))) %>% 
  ggplot() +
  geom_tile(aes(start_dow, name, fill = n), color = "#252a32", size = 0.75) +
  scale_x_discrete(expand = c(0, 0.5), position = "top") +
  scale_y_discrete(expand = c(0, 0.5)) +
  scale_fill_viridis_c(direction = -1, option = "magma", name = "Usage (hrs)") +
  labs(
    x = NULL, y = NULL,
    title = "Top 10 App usage by day of week"
  ) +
  theme_ft_rc(grid="")

I really need to get into the habit of using the RStudio Server access features of RSwitch over Chrome so I can get RSwitch into the top 10, but some habits (and bookmarks) die hard.

FIN

Apple’s Screen Time also tracks “category”, which is something we can pick up from each application’s embedded metadata. We’ll do that in a follow-up post along with seeing whether we can capture iOS usage now that I’ve enabled Screen Time on those devices as well.

Keep spelunking the knowledgeC.db table(s) and blog about or reply in the comments with any interesting nuggets you find.